
Hey there, I’m back with another tutorial! In this one, you’re going to learn how to make reflections using tiles for water.
Here’s what we’re going to achieve through this tutorial:

This tutorial is for GameMaker Studio 2.
This tutorial simply covers the mirroring of sprites and drawing them over tiles. You can have complete top-down reflections with a realistic shader in your game, all for only 2 bucks – pay once, use it in as many projects as you like! This is what it looks like:
So let’s get started!
Getting It Ready
This is my test project. I just have a player object and a layer of water tiles.
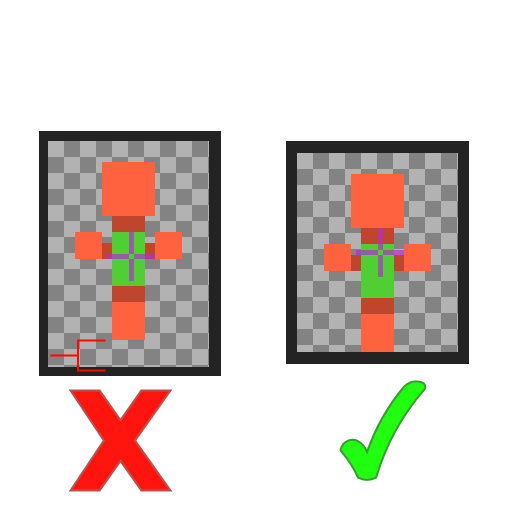
Note: Make sure there is no empty space below the player sprite.
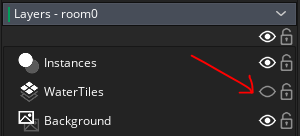
So to start, you need to disable the visibility on your tile layer, because we are going to draw the tiles manually onto a surface. So make sure that the tile layer is invisible:
Now create an instance layer, and place it below your normal “Instances” layer. This layer will be used to hold the object that will draw the water tile, so it needs to stay below your normal layers so that it appears below other layers in the game.
I’m naming this layer “TilesInst”.
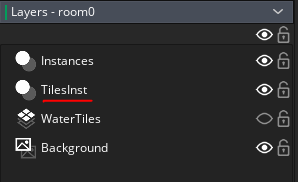
Now create an object. I’ll call it obj_watertiles. Place it inside this newly created “TilesInst” layer.
Drawing Tiles Onto A Surface
For this, I’ll use obj_watertiles. Add a Create event and put this code:
var w = camera_get_view_width(view_camera);
var h = camera_get_view_height(view_camera);
water_surf = surface_create(w, h);
Here, I’m creating a surface that is the size of the camera. If you’re using views, just replace those camera width/height functions with view_wview[0] and view_hview[0].
I’ll call this surface water_surf. We will draw our water tiles and the reflections onto it.
Then I’ll add the Draw Begin event and add this code:
if (!surface_exists(water_surf)){
    var w = camera_get_view_width(view_camera);
    var h = camera_get_view_height(view_camera);
    water_surf = surface_create(w, h);
}
else{
    surface_set_target(water_surf);
    draw_clear_alpha(0, 0);
    surface_reset_target();
}
This is nothing specific to this tutorial. This is just general stuff you should do for surfaces.
The first condition checks whether our water_surf surface exists, and if it does not, it creates it again. The three lines of code that follow are just from the Create event.
The else part runs if the surface exists. Here, the surface will be cleared. This is important, because the things you draw onto a surface aren’t removed, everything just stays there – so you manually need to clear it before drawing stuff onto it.
Now it’s time for the real thing. Add the Draw event and add this code:
//Get tilemap
var tilemap = layer_tilemap_get_id("WaterTiles");

//Set surface
surface_set_target(water_surf);

//Draw tilemap
var cx = camera_get_view_x(view_camera);
var cy = camera_get_view_y(view_camera);
draw_tilemap(tilemap, -cx, -cy);

//Reset surface
surface_reset_target();

//Draw surface in game
draw_surface(water_surf, cx, cy);
Get tilemap:
This part gets the tilemap from the original layer that contains the water tiles, the one which is invisible. So you need to specify its name in the function argument, which in my case is “WaterTiles” (You can see it in the screenshots above). Then it is stored in a variable, which I’m calling tilemap.
Set surface:
Here I’m making the water_surf surface the target for further drawing functions, so everything after this will be drawn onto that surface.
Draw tilemap:
For drawing the tilemap onto the surface at the correct position, I first need to get the position of the camera, and store it in variables.
If you’re using views, use view_xview[0] and view_yview[0] to get the view position.
Then I’m drawing the tilemap using draw_tilemap, at position (-cx, -cy,) so that the tilemap is drawn at (0, 0) inside the room. (Because normally, (0, 0) would be the top-left corner of the surface, not the room).
In other words, I’m subtracting the camera coordinates from the surface coordinates to get the relative position of the room’s top-left corner.
Reset surface:
This function resets the surface target. Because we are done drawing stuff onto our surface, we no longer need it to be the target for the draw functions.
Draw surface in game:
This will draw the water_surf surface in the room at the camera position.
Now if you run the project, the tiles will appear normally, as they did before.
Player Reflection
For this, you need to add the following code into the Draw event we just coded, before the “Reset surface” part:
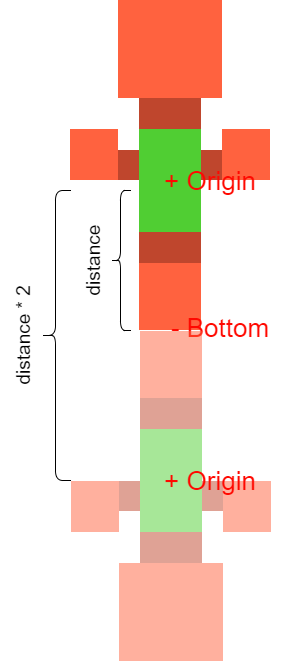
//Draw reflected player sprite
//Get player y offset for reflection
var yoff = (obj_player.sprite_height - obj_player.sprite_yoffset)*2;

//Set blendmode
gpu_set_blendmode_ext(bm_dest_alpha, bm_inv_src_alpha);

//Draw reflection
draw_sprite_ext(obj_player.sprite_index, obj_player.image_index, obj_player.x - cx, (obj_player.y+yoff) - cy, obj_player.image_xscale, -obj_player.image_yscale, 0, -1, 0.6);

//Reset blendmode
gpu_set_blendmode(bm_normal);
Replace obj_player with your desired object’s name.
The first line gets the vertical distance from the bottom of the player sprite to its origin, then multiplies it by 2. This will be the offset used for drawing the flipped sprite for the reflection.
Then I’m setting the blendmode so that the sprite pixels are drawn where there already are pixels on the surface. So if we draw a sprite now, it should only appear on the water and not on the empty area.
Then I’m using draw_sprite_ext() to draw the flipped sprite. For the position, I’m drawing it at the player’s location + the offset we calculated earlier, and from that I’m subtracting the camera coordinates, so that it appears at the right place on the surface.
You can see that I’m using “-obj_player.image_yscale” for the yscale of the sprite. This way it will appear flipped. So if the yscale of the player sprite is 1, the yscale of the reflection will be -1.
Lastly, I’m using “0.6” as the alpha of the sprite.
All in all, your Draw event should look like this:
//Get tilemap
var tilemap = layer_tilemap_get_id("WaterTiles");

//Set surface
surface_set_target(water_surf);

//Draw tilemap
var cx = camera_get_view_x(view_camera);
var cy = camera_get_view_y(view_camera);
draw_tilemap(tilemap, -cx, -cy);

//Draw reflected player sprite
//Get player y offset for reflection
var yoff = (obj_player.sprite_height - obj_player.sprite_yoffset)*2;
//Set blendmode
gpu_set_blendmode_ext(bm_dest_alpha, bm_inv_src_alpha);
//Draw reflection
draw_sprite_ext(obj_player.sprite_index, obj_player.image_index, obj_player.x - cx, (obj_player.y+yoff) - cy, obj_player.image_xscale, -obj_player.image_yscale, 0, -1, 0.6);
//Reset blendmode
gpu_set_blendmode(bm_normal);

//Reset surface
surface_reset_target();

//Draw surface in game
draw_surface(water_surf, cx, cy);
And that’s all! Run your project and see how it looks.
It works!
Conclusion
Hope this tutorial helped you! If you have any further questions or doubts, join my Discord server (no sign-up required) and you can get all the help you want there, for free. You can also find me there (username: matharoo#2804).
Also check out my pop-up text box asset on the marketplace!
Receive updates on new & upcoming tutorials by liking our Facebook page.
See you, and happy dev’ing!

Hi , is it possible to create the reflection also if looking up on it ? (i have collision on water so no walking on them and this way the reflection only show if im above the water but not if im below the water)
Thanks !
LikeLike
Not sure what you mean. If you can’t go into the water, the reflections should still function the same way.
LikeLike
how would I go about reflecting multiple objects?
LikeLike
Try a DS List or a with() statement using parents.
LikeLike